
The Mixer
The Mixer is pretty straightforward, enabling you to balance and enhance your song and recordings even if you are a complete audio engineering novice. You’ll also benefit from seeing the track meters bounce up and down in time to your song, giving you a visual representation of the relative loudness of each track. Additionally, there’s a drum kit select popup, so you can evaluate different drum sounds when you are making the final touches to your mix (activated by the headphones button).
Volume and Panning
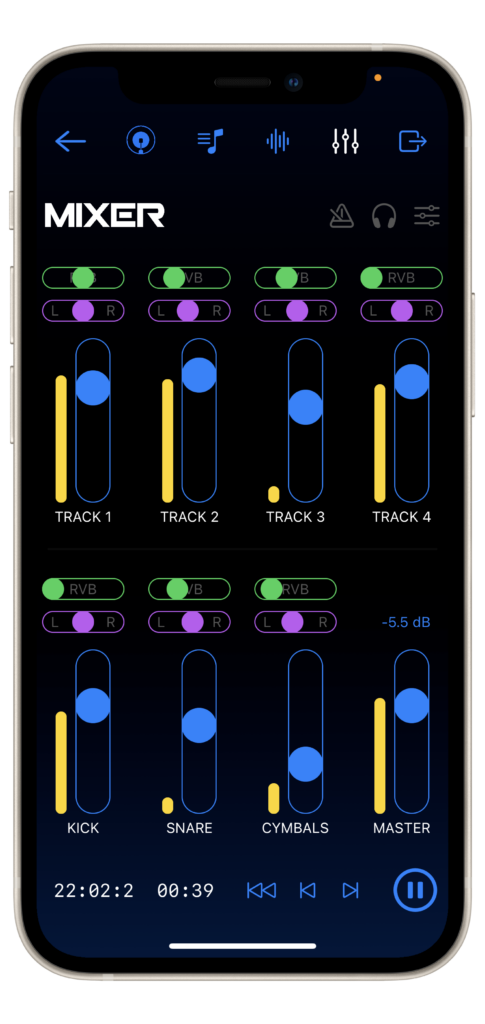
The mixer is really simple to use – move the blue fader dots for each track (1-4) up or down to make the corresponding recordings louder or quieter, and use the same approach to balance the individual drum elements of your beat patterns (Kick, Snare, and Cymbals). To the right of the drum tracks, there is a Master fader allowing you to adjust the volume of your overall mix (but remember that you have control over your master volume using your device’s volume buttons too). It might not be obvious, but there is a track Solo feature built in as well: just tap the name of any track and it will immediately become the only track you hear. You can then skip to a different track by pressing a new track name instead, or press the name of the soloed track again to revert to the normal mixing setup. You’ll see that a fader turns grey when it is muted or with zero volume, so that should help you out if you are wondering why you can’t hear a particular track which you recorded!
Additionally, the four tracks and three drum channels feature panning controls, and auxiliary reverb sends. These controls allow you to spread out your recordings creating a sense of space and depth, which can sound pretty awesome in headphones in particular. Just move the purple control dots above each track to the left or right to position elements in the preferred stereo position.
A cool way to spice up a demo can be to record the same part twice, and pan one version left and one version right – if you’re an acoustic guitarist give this a try to achieve a big wide sound! For pianists, you can play low notes on one recording and then higher notes on a second pass, then pan the low notes a little left and the high notes a little bit right (for a pianist perspective). This approach also leaves some space in the centre of the stereo image if you are going to sing afterwards. Vocalists can even layer up double tracks and harmonies, and spread them left and right across the stereo field. There’s really no end to the creativity you can have with simple panning!
Adding Reverb
To add reverb to a channel, just push the green reverb control dot to the right – this increases the amount of ambience you will hear on each track.
Songzap’s unique reverb algorithm actually features a number of effects chained together, including an additional echo/delay effect in parallel and a series stereo widening feature, giving your overall ambience a welcome spread and smooth decay tail. Of course, in professional studios we use lots of different high-quality reverbs, delays, and processing effects to make recordings sound more realistic or even larger than life, but the intelligent Songzap reverb has been designed specifically to get you a number of different flavours with a single slider control. A little Songzap reverb can be enough to make a lead vocal or electric guitar line sound more lush and realistic, whereas greater amounts can turn a single music channel into a wide stereo stage, which can be useful for generating ambience and subtle background layers.

Dynamics and EQ
Songzap has already taken advantage of a useful amount of tracking compression when recording through the phone’s mic, and therefore your recorded tracks should be pretty consistent dynamically, if you have used sensible microphone positioning when you recorded. If you’ve not heard of compression before, don’t worry about it – in a recording studio it’s valuable for producers to have fine control of the volume (or dynamic) profile of a recording, and they do this by adding different types and amounts of compression.
For a full walk-through of the Tracking features click here.
Compression can make a vocal recording stand out in the mix and make drums sound powerful and impactful, whilst also levelling out some volume variations in the performance. Songzap utilises some built-in intelligent compression algorithms, which means that your recordings will automatically sound strong and present without having to adjust any settings. However, if you want to add a little more compression to a track, you can!
To activate the compressor control, you’ll need to open the advanced processing view, by pressing the button with the three horizontal faders from the top menu (alongside the Mixer title). You can then adjust the compression (CMP) slider to add more density and impact to a particular track. Be thoughtful with your use of this – it’s all very well slamming everything to be fully compressed and intense, but in reality, over-compressed music contains a lot of unwanted distortion artefacts and gets quite fatiguing to listen to after a few seconds. Use the compression setting to just give some mix elements a little extra boost and presence in the mix, or to even out any recordings that vary in volume considerably. With the advanced processing view active, you’ll also see two equaliser controls for boosting both low frequencies (EQL) and high frequencies (EQH) in each track. Sometimes an acoustic guitar just doesn’t sound deep enough after the recording, so you might want to add a low EQ boost to give it more fullness. Equally, you might see a benefit from adding some high EQ to give vocals or other instruments a bit of presence and ‘cut-through’ in a busy mix. Again, use these wisely, since EQ can start to sound a little unnatural when boosted too much.
Finishing the Mix
Songzap uses some clever internal processing to stop your mixes from overloading into distortion, however, only your ears can be a true judge of audio quality. Make sure that your overall track is not too loud – a little headroom can really help avoid digitally clipping. If you hear any nasty distortion creeping in, then you should probably turn everything down a little bit. To help with keeping an eye on the mix levels, there is a master peak-level reading above the master fader. The peak reading shows you how loud the final mix is in decibels (or more correctly ‘full-scale decibels’). The most important thing to know is that 0 dB is the loudest a digital audio file can be, without going beyond the limits of the equipment we use for playback – beyond 0 dB, the audio will be ‘clipped’. Anything below 0 dB (i.e. negative decibels) is just fine and shows you are under the full-scale limit. So, just make sure your mixes don’t go above 0 dB – you’ll see the peak reading goes orange if you reach -0.5 dB and goes red at -0.1 dB. If you see any of these warnings come on, then start turning your tracks down a little. You can turn down the master fader, too, to avoid peak clipping.
Once you are happy with your mix, you can export it in a number of different formats – either click on the top-left Back arrow to return to the home page and access the Export page; or go directly to it by clicking on the top-level menu Export button on the right.
Finally, there is a click-track available via the Metronome button at the top right of the Mixer, which you can turn on if you want to check the timing of your recordings before exporting (particularly useful if you have not been using beat patterns to record). You can also use the metronome volume fader to set the loudness of the click track to your preferred level when recording. The metronome sound won’t be included in any exported mixes or audio files, but it’s a good idea to turn it off when doing your final mix anyway, so you can focus purely on the creative merits of your work!